Squats are one of the most effective exercises for building strength, improving mobility, and enhancing athletic performance. But one small mistake—your pelvic position—can make the difference between a safe, powerful squat and one that places unnecessary stress on your body.
Whether you’re a beginner, an experienced lifter, or someone simply trying to move better, understanding pelvic tilt can help you squat with better form and reduce your risk of injury.
What Is Pelvic Tilt?
Your pelvis acts as the foundation of your spine. During a squat, it should remain in a neutral position, allowing your hips, spine, and core to work together efficiently.
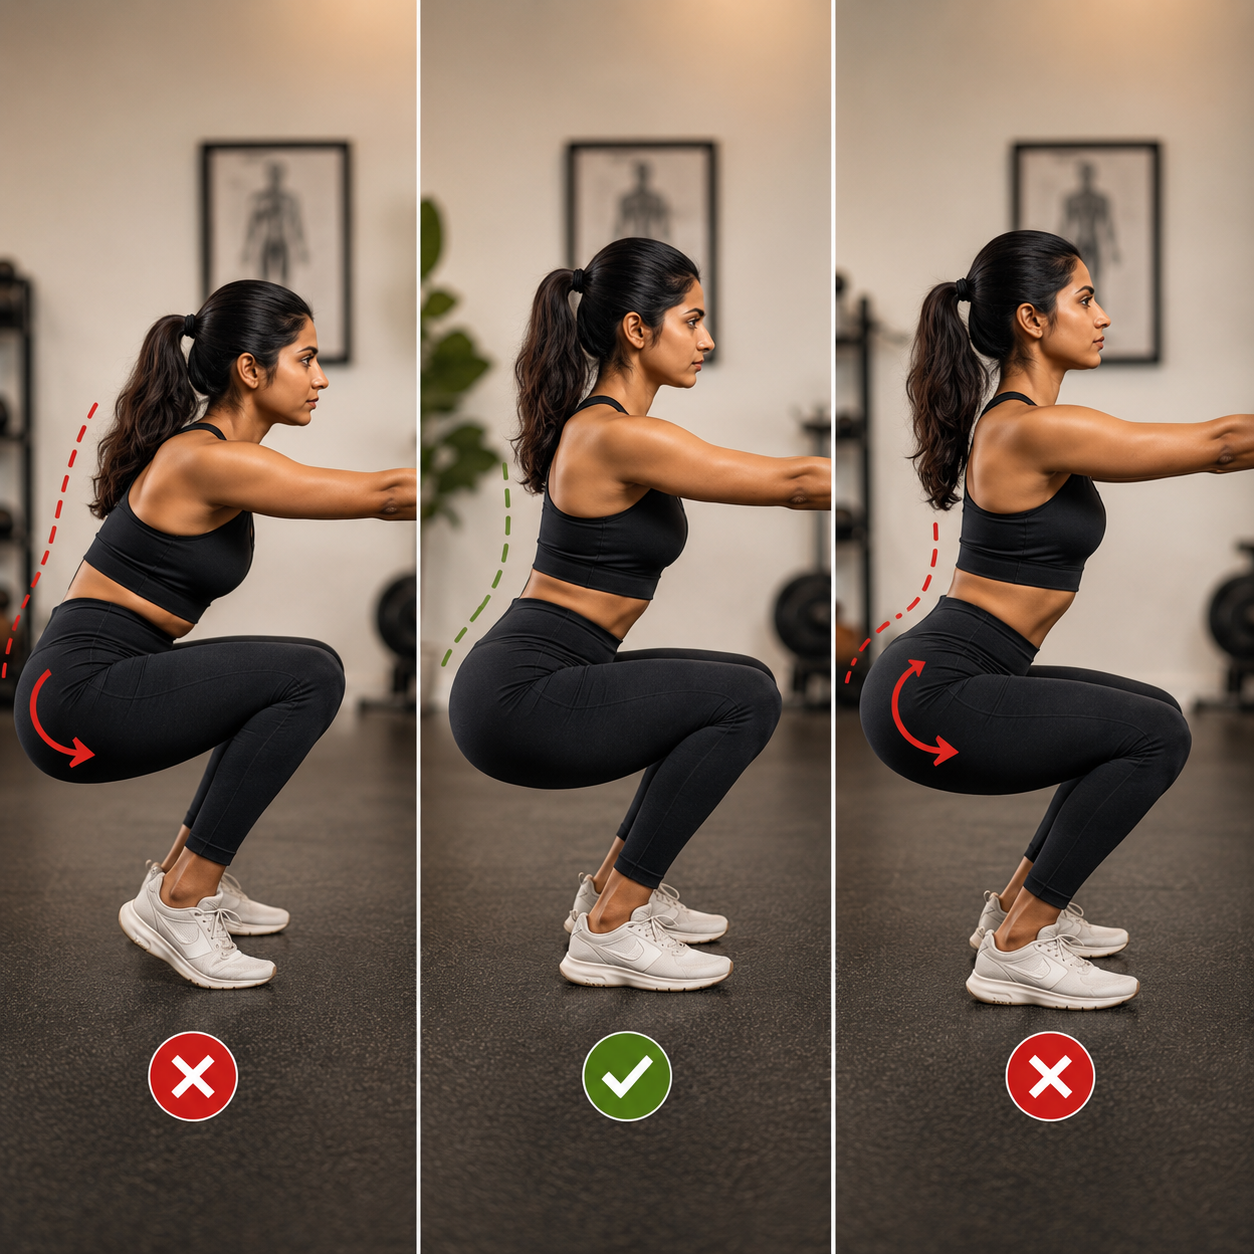
There are three common pelvic positions:
- Posterior Pelvic Tilt – pelvis rotates backward (“tucking under”)
- Neutral Pelvis – natural spinal alignment
- Anterior Pelvic Tilt – pelvis rotates forward (excessive arch)
The goal isn’t to force a perfectly straight spine—it’s to maintain your natural spinal curves throughout the movement.
1. Posterior Pelvic Tilt (“Butt Wink”)
A posterior pelvic tilt happens when your pelvis rotates backward at the bottom of the squat.
Signs
- Lower back rounds
- Tailbone tucks underneath
- Chest collapses
- Heels may lift off the floor
- Knees may move inward
Why It Happens
- Tight hamstrings
- Limited ankle mobility
- Weak core
- Poor hip mobility
- Squatting deeper than your mobility allows
Problems It Can Cause
- Increased stress on the lumbar spine
- Reduced glute activation
- Less stability
- Decreased power production
- Limited squat depth
2. Neutral Pelvis (Ideal Position)
A neutral pelvis allows your body to transfer force efficiently.
Benefits
✔ Natural spinal alignment
✔ Better glute activation
✔ Stronger leg drive
✔ Improved balance
✔ Greater stability
✔ Better force production
✔ Safer movement pattern
Your goal isn’t perfection—it’s maintaining good alignment while moving naturally.
3. Anterior Pelvic Tilt
An anterior tilt occurs when the pelvis rotates too far forward, creating an excessive arch in the lower back.
Signs
- Lower back arches excessively
- Ribs flare outward
- Core loses tension
- Weight shifts toward the toes
- Heels may rise during the squat
Common Causes
- Tight hip flexors
- Weak abdominal muscles
- Poor bracing technique
- Limited ankle mobility
- Lack of body awareness
Risks
- Increased pressure on the lower back
- Reduced core stability
- Knee discomfort
- Less efficient movement
- Greater injury risk over time
Why Heel Position Matters
One of the easiest ways to identify poor squat mechanics is by watching your heels.
When your heels stay grounded:
- Better balance
- More glute engagement
- Greater force production
- Improved stability
- Proper weight distribution through the feet
When your heels lift:
- Weight shifts to the toes
- Knees take on more stress
- Balance decreases
- Power drops
- Hip mobility is often limited
A good cue is to keep your weight distributed through the tripod foot:
- Heel
- Base of the big toe
- Base of the little toe
All three points should stay connected to the ground.
Common Reasons People Lose Neutral Pelvis
If you’re struggling with pelvic position, the issue usually isn’t the squat itself.
It may be caused by:
- Tight hip flexors
- Weak glutes
- Weak core muscles
- Poor ankle mobility
- Tight calves
- Limited hip mobility
- Rushing into heavy weights before mastering technique
Addressing these limitations often improves squat mechanics naturally.
How to Improve Your Squat
1. Improve Ankle Mobility
Better ankle mobility allows your knees to travel forward without forcing your heels off the floor.
2. Strengthen Your Core
A strong core helps stabilize your spine and pelvis throughout the movement.
3. Activate Your Glutes
Exercises like bridges, clamshells, and band walks can improve glute engagement before squatting.
4. Stretch Tight Hip Flexors
Tight hip flexors often pull the pelvis into an excessive anterior tilt.
5. Control Your Depth
Only squat as deep as you can while maintaining good alignment. Quality is always more important than depth.
Squat Form Checklist
Before each squat, ask yourself:
✅ Feet shoulder-width apart
✅ Weight evenly distributed across the entire foot
✅ Heels remain on the floor
✅ Core braced
✅ Spine stays neutral
✅ Knees track over toes
✅ Hips and knees move together
✅ Pelvis remains as neutral as possible
Final Thoughts
Squats shouldn’t cause back pain, knee pain, or instability. In many cases, those problems stem from poor movement mechanics rather than the exercise itself.
Maintaining a neutral pelvis, keeping your heels grounded, and moving within your mobility limits can dramatically improve both performance and long-term joint health.
Remember: The best squat isn’t the deepest squat—it’s the one you can perform with control, stability, and proper alignment.